Posts

Showing posts with the label Frugal

Cleaning the Silver for the Holidays the Easy Way

For those of you who don't know what washing soda is, it is the BEST stuff for cleaning sterling silver. Put a tablespoon in a bowl lined with aluminum foil then add hot water. Just drop in your sterling silver pieces and it starts to fizz away. Leave on for about 5-10 minutes then take out and rinse in cold water. Where to buy Washing Soda? Here: http://www.acehardware.com/product/index.jsp?productId=3549579&cagpspn=pla

Plarn!

I love this idea! Take plastic grocery bags, cut them up, and make plarn (plastic yarn). It's easy and cool! Even I can make plarn and knit or crochet a sturdier plastic grocery bag out of those flimsy ones they give you at the store. Here's the link to learn to make plarn: http://www.etsy.com/blog/en/2010/how-tuesday-how-to-make-plarn-crochet-an-eco-friendly-tote-b/   *´¨) ¸.· ´¸.·*´¨) (¸.·*  Lena Austin http://www.LenaAustin.com http://depravedduchess.blogspot.com

January Traditions-- Yaaarn!

Knitting and crocheting are the most obvious forms of yarn work, and in the depths of winter they’re a handy craft to know! (No pun intended.) I’ve spent many a winter day snuggled under a crocheted or knitted project, and was almost sorry to give it away! While both will always have their proponents, even those who are intimidated by the needles and hooks can do the plastic knitting looms currently available in many craft stores. Do I expect you to knit a sweater or sock your first time? Heck no! The joy is in the learning, and sometimes even a simple knitted square is a triumph with a use. My dear friend makes the most wonderful hand-knitted and crocheted face cloths that beat plain old terry cloth face cloths hands down! Even I can manage face cloths, and I freely admit yarn crafting isn’t my favorite fiber art. However, my lack of enthusiasm hasn’t stopped me from making the occasional stocking hat, beret, washcloth, or even a bag or two. So, be a kid again. Pick up a simp...

January To-Do-- The Witches' Belt

The Witches’ Belt Spun craft can take a very useful and fashionable turn if you make yourself a cingulum. Depending on your tradition, the cord worn by a witch can have many different uses and meanings. 1. Cingulums are 4-1/2 feet in length so they may be used as a compass to draw the nine-foot circle of some traditions. Some other traditions demand that the cord itself be nine feet in length and wrapped around the body a minimum of three times when worn as a belt. 2. Postulants are bound with a cord for their initiation. In some traditions, this cord becomes their first cingulum. In some traditions, this cord is white to signify the novice. This is not true in all traditions. 3. Practitioners of ceremonial magick may have several knots in their cingulum to measure inner and outer Circles. 4. Some traditions may weave and join cingulums as a witch achieves rank, so her novice’s belt may be twisted and woven with her new level’s belt as a reminder to never forget what she has...

How Clean is Your Kitchen?

Image
Dinner Diva This is a great article to share with your friends & family How Safe Is Your Kitchen? By Leanne Ely, C.N.C. Dirty dining reports are becoming quite popular with local news stations all around the country and are grossing out America at the same time. I'm sure you've seen it before; local reporters go into the kitchens of restaurants to see what health code violations they can find. I'll spare you the gory details, but it's usually one more reason I prefer to cook my meals at home. But let me ask you-- how would your kitchen stand up to one of these inspections? I like to keep my sink shiny (thanks to FlyLady ) and my pantry neat (thank you Rubbermaid ) but as you may have seen in my pantry makeover blog just about a year ago, I found an old sprouting potato hiding in the dark recesses of my pantry. It happens! So how safe is your kitchen? When is the last time you gave your fridge and freezer a good disinfecting? How old is the shelf liner in yo...

A great gift idea for the holidays--Stick it Right on the Money Stickers

http://www.stickitrightonthemoney.com/ This has to be the most innovative way to give a plain old monetary gift some pizzazz to show you really did think about  what gift would suit the recipient. My mother in law used to say that giving money, gift certificates, and gift cards were in a way a cop out and borderline rude. They require very little thought, and while "one size does fit all" it does show a certain casual disregard for the likes and dislikes of the recipient or even little more than a nod to the occasion. However in today's busy world, sometimes giving cash can mean a whole lot more, especially when friends and family can be many miles apart. Cash spends well without having to worry.   Now, with Stick It Right On the Money stickers, you can do more than give a nod to the occasion! Each frame and sticker are "Post-it" sticky, so the money isn't damaged. (That's illegal.) See the video at the website. What a great gift idea. Lena Austin http:...

Quilting 101- How to Use the Book and this Blog

Image
I'll start by inserting the scanned page from the book. You'll need to save it to your computer and print it out or look at it with the Zoom feature. After that, we'll discuss it via Comments. Okay, now for the discussion. I'll post the list of supplies ASAP. I'll post the page with a template or pattern when it's needed. Once again, I remind you to save the plastic lids to margarine tubs, coffee cans, sour cream containers, and similar plastic lids. You'll need many. Also, save as many of the plastic inserts in bacon packages as you can. These will come in especially handy for some of the larger templates. I've looked at them, and they are some of the most common templates available. You'll want permanent copies.  I suggest you think very seriously about color schemes. You may have already noticed a theme or color scheme you particularly favor. For instance, I'm well known for loving hot tropical colors like Caribbean blue, hot pink, and ...

Learning Quilting Together

I've already spoken with TJ about this by phone, since her internet will be out for another few days. She's in, so I'm including her in these emails. (Susan, you may include Elf in this if she wishes.) I'll also be posting this on my Third Infinity blog. I found among some of the books Karen DeAngelo gave me a book called, "You can be a Super Quilter!" by Carla J. Hassel. (ISBN 0-87069-294-1) I've hyperlinked it to the Amazon.com listing, where it's on sale for cheap if you want your own copy. What a great book! It's like a workbook, taking you step by step through the process. The plan is for me to scan the pages and discuss them with you, page by page and lesson by lesson. Eventually, we'll all be learning together and doing the "homework" together via the internet. Upon occasion, we can learn about alternative methods using more modern conveniences or options, since the book was written thirty years ago. However, this book w...

Uses for Ice Cube Trays

Quite a few people have seen me blog about using ice cube trays to freeze chicken, vegetable, or beef broth into manageable cubes for use in recipes. Here are a few more: Ice cube trays are perfect little organizers. They can be used to freeze herbs, coffee/tea and baby food. They stack easily, so use them to organize jewelry, loose change, tacks, paper clips, small screws and bolts or buttons. They're great to hold different-colored paints for kids or candies, a variety of dips, to grow seeds or as a candy mold.

Wall Pegboard Storage

Image
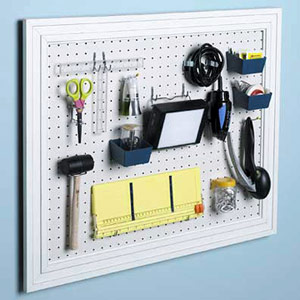
Use Wall Space for Storage!    Empty wall space can become a useful storage area, and it's a great way to keep scissors and other scrapbook tools out of little hands. Go to the thrift store to save big bucks and dig through the wall art for a frame whose shape or texture you like. Don't worry about color, or even if it has glass. You can change the color, and you don't need the glass anyway. Now go to the hardware store and cut a piece of pegboard to size, and secure the pegboard inside the frame. Give the wall hanging a coat of paint for a uniform look. Paint the frame in a contrasting color if desired, and decorate to suit your personal tastes. My mother, a veteran of both oil painting and stained glass art, changes frames the way we change clothes. one frame of a seascape is covered with an old thick rope she salvaged from the beach. For another, she recycled a few silk flowers to match the painting in the frame. Use your imagination and indulge your senses in...

Spinning Tool Caddy

Image
Spinning Tool Caddy Craft an inexpensive desk caddy for go-to tools and supplies. Clean up cans of all sizes and stick them to a lazy Susan with heavy-duty adhesive . Wrap the cans in patterned paper for a personal touch. (To eliminate sharp can edges, cover them with masking tape or the colorful duct tape now available in many craft stores. Add a little bling with rhinestones, buttons, beads and bows if you desire. This is all about you!

Fw: Pokey's Sharing a Cool Secret for making Holiday Ornaments

Image
From: Quilting Daily <quiltingdaily@interweave.com> To: voiceomt2002@yahoo.com Having problems viewing this email? View it in a browser window. Share this on:   Quilting Arts Gifts is a special issue of Quilting Arts Magazine devoted to the art of gift-giving! September 9, 2010 My Recipe for No-sew Snowflakes It's no secret I'm a surface design junkie. Over the years, I have amassed an overflowing stash of fabrics that have been dyed, printed, screened, stamped, and stenciled. Not only do I despair of ever using these fabrics up in art quilts, I have to admit that some of them aren't quite art quilt-worthy. I also have to admit that, being a surface design junkie, I also collect a ton of objects that could be used in surface design. A category of those objects is cookie cutters—implements that I can assure you will never be used in the presence of butter and sugar. Soy wax, maybe. So you can imagine my delight wh...

Buffet Buckets

Image
Here's a Quickie Craft for any Season! Take small metal buckets and wrap them with paper! The example in the picture shows them with a map for a Bon Voyage party, but I can see holiday wrapping paper, birthday paper, scrapbook paper, and even fabric! What a fun and easy way to make those utensils readily available for a picnic, cookout, or buffet table. After the party, just slip off the paper and store it for next time. If you use fabric, iron a stiff interfacing onto the back so it stays upright. Next up: Cloth napkins in a flash. It's going green! -- Posted By Lena Austin to CrafteeChix at 9/02/2010 01:43:00 AM

Thread Painting

Image
I think I just discovered a new and fun way to play with my threads-- thread painting. Thread painting --by my definition-- is the art of using all those lovely thread colors to create a picture using stitches programmed into my sewing machine. Example: Note that the leaves on the left are rather plain. Pretty, but plain, despite the use of a bit of gold dye in the manufacturing. The same set of leaves on the right were thread painted using a simple orange Coats and Clark thread, and my plain old everyday running stitch. Now they really stand out! That was just playing and experimenting. Right now, I want to go play with everything! I must calm down, but I see many possibilities with this. I look forward to attempting new and interesting things in the coming months. After all, I only stitched the veins of the leaves. I can well imagine stitching up the entire inside of a circle in a spiral (which is so very symbolic), just like I do with Russian Punch Needle, only infinitely easi...

No Cook Ice Cream

Image
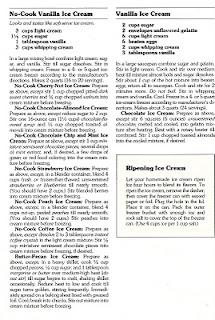
It's too hot to cook, not even for ice cream. Here's some treats that don't need it.

Gardening: Hypertufa Garden Furniture and Sculptures

How to make Hypertufa Garden Furniture Step 1: Gather Your Materials You may have many of these supplies on hand. The remainder can be found at a building supply store to make a trough that measures 16x16 inches. Tape (Duct, Masking, even Painter's) Tape measure or ruler Marker Serrated knife Sheet of 2-inch-thick foam insulation boards Eight 3-1/4-inch nails Rubber or latex gloves Quikrete Portland cement Perlite Peat moss Reinforced concrete fibers Water Gallon container 1/2-inch dowel 3/8-inch-thick plywood board (2x2 feet) Spray bottle Sheet of plastic or trash bag Wire brush or screwdriver (optional) Wheelbarrow Hoe Step 2: Prepare the Mold Using the serrated knife, cut insulation into two 16x6-inch pieces and two 18x6-inch pieces. Assemble these four sections into a square or rectangle, depending on how you join the ends. Insert two nails through the insulation material -- one near the top and one near the bottom -- of each intersection. Test Garden ...