Fw: [CrafteeChix] Another Great Craft-- Cart/Stroller Organizer Bags
Before I forget, let me give you the link:
http://www.simplicity.com/p-1615-crafts.aspx
I made a prototype over the weekend, and I'm so pleased with how easy this is, I had to share.

Surprisingly enough, the only changes I made were obvious to a quilter.
1. I made my own binding instead of buying bias tape. To me, I can get better color matches by buying my own material and making a bias binding.
2. The directions say to turn the straps from the narrow ends. I decided to make the turning "hole" on the long ends for easy turning. Do what you want. I'm just lazy.
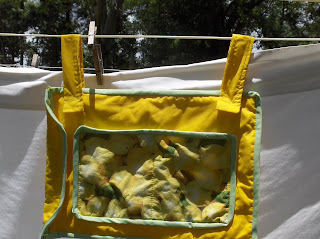
Note in the first picture that the pocket in front is divided straight down the middle. You don't have to do it that way. If you'd prefer a narrow pocket on one side for a pen and a larger pocket for a calculator and coupons on the other side, just move the sewing line over.
Also, not this has a huge inner compartment for all your recipe cards and notes, so you can take them with you for reference if need be. I love the idea of having a hidey-hole for the things I don't want people to see, such as recipes, fabric swatches, or other items I may or may not need. I can't wait to hang this by my door on my "Launch Pad" table next to the keys and my purse. This handy little tote could become my favorite!
This organizer is so versatile, I'm having a blast. My mind just scintillates with ideas for quilting it or embroidery, and definitely I can see quilt blocks for the pockets! I can't wait to make up a few more to give as gifts this holiday season. This yellow one is mine, though! LOL!
--
Posted By Lena Austin to CrafteeChix at 7/06/2010 01:54:00 PM
http://www.simplicity.com/p-1615-crafts.aspx
I made a prototype over the weekend, and I'm so pleased with how easy this is, I had to share.

Surprisingly enough, the only changes I made were obvious to a quilter.
1. I made my own binding instead of buying bias tape. To me, I can get better color matches by buying my own material and making a bias binding.
2. The directions say to turn the straps from the narrow ends. I decided to make the turning "hole" on the long ends for easy turning. Do what you want. I'm just lazy.
Note in the first picture that the pocket in front is divided straight down the middle. You don't have to do it that way. If you'd prefer a narrow pocket on one side for a pen and a larger pocket for a calculator and coupons on the other side, just move the sewing line over.
Also, not this has a huge inner compartment for all your recipe cards and notes, so you can take them with you for reference if need be. I love the idea of having a hidey-hole for the things I don't want people to see, such as recipes, fabric swatches, or other items I may or may not need. I can't wait to hang this by my door on my "Launch Pad" table next to the keys and my purse. This handy little tote could become my favorite!
This organizer is so versatile, I'm having a blast. My mind just scintillates with ideas for quilting it or embroidery, and definitely I can see quilt blocks for the pockets! I can't wait to make up a few more to give as gifts this holiday season. This yellow one is mine, though! LOL!
--
Posted By Lena Austin to CrafteeChix at 7/06/2010 01:54:00 PM


Comments